
Remember when we had to copy a file to a disc and hand (or mail) it to the recipient if you wanted to share a large file that was too big to email? Thankfully, today, as far as file sharing goes, you have a ton of options that enable you to share big files easily, as well as store them in a cloud, sync them across multiple devices, and even collaborate on them with colleagues and clients. So, if you are fed up with clogging up your mailbox with large files, or you are still guilty of using a memory stick for file transfer, this blog is for you. Here are five free and cost-effective tools for sharing large files.
WeTransferWeTransfer is one of the best known and most used file-sharing solutions by all kinds of professionals. In addition to being very simple to get to grips with, it lets users share large files of almost any format. With the free service, you can share files up to 2 GB over WeTransfer at a time, which is way more than most email servers allow for email attachments. The paid version of the service permits the sharing of files up to 20 GB in one go.
If you are new to sharing files online, view our Guide to WeTransfer to get you started.
Microsoft OneDrive and Microsoft SharePointOneDrive is an Internet-based storage platform with a weighty portion of space offered for free by Microsoft to anyone with a Microsoft account. The free storage is there even if you never use OneDrive. In fact, if you have a Microsoft account, you’re all signed up for OneDrive.
Think of it as a hard drive in a cloud which you can share, with a few extra benefits thrown in too. OneDrive gives you a place to put your files and photos on the Internet and access, edit and share them with colleagues, clients and friends from any device, anywhere – you can collaborate with them in real time too. This OneDrive beginners guide will walk you through the steps.
Being another tool from Microsoft, SharePoint is often mistaken as the same thing as OneDrive. They do have overlap, but they are not the same. OneDrive is essentially an online folder system for file storage, typically used by individuals and business colleagues who need a central location to store and access files. SharePoint is more of a collaboration tool for businesses that need multiple individuals and teams to work on documents and products at the same time. The differences between SharePoint and OneDrive can get quite involved, so for the purpose of this article, understanding that one’s more storage and one’s more collaboration is good enough.
Google Drive
Popular with Google account holders. Google Drive is another cloud storage tool that makes sharing and accessing files on any device a doddle. Its popularity is built on useful collaborative tools and built-in integrations with Google’s suite of products and services. If you have a Google account, you already have 15 GB of free storage to utilise on Google Drive.
Built to work seamlessly with Google, you can enjoy uploading and saving a heap of file types from photos, audio, documents and videos to Google’s servers (the “cloud”). It can serve as a great backup solution, or simply as a way to free up space on your device.
DropboxDropbox was one of the first cloud storage companies and like all the other file sharing tools we have already covered, it you can share files, edit and share them from anywhere, back up important files and collaborate with others. Its loved for its simple user interface – no confusing buttons, just “folders” that look like folders. Being one of the first online sharing companies, they invested a lot in publicity, grew their brand that makes them appear more well-known than their competitors.
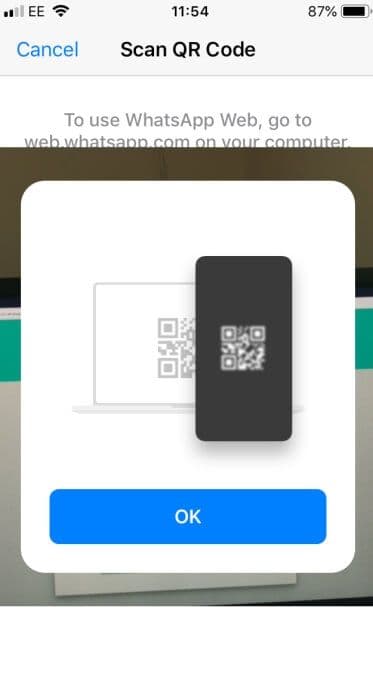
How to use WhatsApp from your desktop to share photos
Did you know you can use WhatsApp to share photos via your desktop? Many of our social media clients prefer to send us imagery via this method for us to use when we are creating their social posts. It is very straightforward, here’s our step-by-step guide:
- 1
On your desktop visit https://web.whatsapp.com/ . The screen will show a QR code which you will need to scan with your WhatsApp phone app:2. On your mobile device, open WhatsApp and click on the Settings button:3. Then select WhatsApp Web/Desktop4. Click the blue ‘Link a Device’ button5. Then you will need to point your phone camera at the earlier mentioned QR code to scan it.
Your WhatsApp messages will then appear on your desktop screen and you can use it from here as normal.
8th March 2021